Executive Summary: Despite the longstanding myth that Macs are immune to malware, macOS devices face a growing and sophisticated range of cybersecurity threats — from adware and spyware to ransomware and credential stealers. This comprehensive guide walks you through everything you need to know about running a virus scan on your Mac: understanding Apple’s built-in security tools like XProtect and Gatekeeper, performing manual checks using Activity Monitor and Terminal, and executing a full, automated scan using 360 Total Security for Mac. Whether you are a first-time Mac user or a seasoned power user, this guide provides actionable steps, expert-level insights, and proactive strategies to keep your system clean, fast, and secure.
Why Is Running a Virus Scan on Your Mac So Important?
Many Mac users operate under a dangerous assumption: that their device is inherently safe from viruses and malware. While macOS does include robust security architecture, the reality of today’s threat landscape tells a very different story. Proactively scanning your Mac for malware is not a sign of paranoia — it is a fundamental act of digital hygiene that protects your personal data, preserves system performance, and safeguards your online privacy. Understanding why this matters is the first step toward building a genuinely secure computing environment.
Debunking the “Macs Don’t Get Viruses” Myth
The belief that Macs are virus-proof is one of the most persistent and dangerous myths in consumer technology. It originated in an era when Apple’s market share was small enough that cybercriminals found it economically unviable to write malware specifically targeting macOS. That era is long gone.
Today, macOS commands a significant and growing share of the global desktop market. As Apple Silicon chips have driven explosive adoption of MacBooks and iMac systems, macOS has become an increasingly attractive target for malicious actors. The threat categories targeting Mac users have expanded considerably and now include:
- Adware: Software that injects unwanted advertisements into browsers and applications, often bundled with legitimate-looking free software.
- Potentially Unwanted Programs (PUPs): Applications that are not overtly malicious but consume system resources, collect user data, or alter system settings without clear consent.
- Spyware and Keyloggers: Sophisticated tools designed to silently record keystrokes, capture screenshots, and exfiltrate sensitive credentials.
- Trojans: Malware disguised as legitimate software, often distributed through unofficial download channels.
- Ransomware: Though less prevalent on macOS than Windows, ransomware strains targeting Mac users have been documented and continue to evolve.
According to a 2026 cybersecurity threat report by Malwarebytes, macOS-specific malware detections have continued their upward trajectory year-over-year, with adware and PUPs accounting for the majority of detections, followed by an increasing volume of information stealers and trojans. The data is unambiguous: Mac users face real, quantifiable risk, and ignoring it is no longer a defensible position.
The Real-World Consequences of Mac Malware
Understanding the abstract concept of “malware risk” is one thing. Appreciating the concrete, real-world impact of a successful infection is another. Here is what can happen when a Mac is compromised and left unscanned:
Data Theft and Privacy Invasion: Keyloggers and credential stealers are among the most damaging forms of malware. Once installed, they silently record every keystroke you make — capturing passwords, credit card numbers, social security numbers, and private messages. This data is then transmitted to remote servers controlled by attackers, who can use it for identity theft, financial fraud, or sell it on dark web marketplaces. Spyware can also activate your webcam and microphone without your knowledge, constituting a severe invasion of personal privacy.
System Slowdowns and Browser Hijacking: Adware is perhaps the most commonly encountered threat on macOS. While it may seem like a minor nuisance, its impact on system performance can be significant. Adware consumes CPU cycles and memory to generate and display advertisements, causing your Mac to run slower and your battery to drain faster. Browser hijackers go further, replacing your default search engine, altering your homepage, and injecting affiliate links into web pages you visit — all without your consent.
Ransomware and File Encryption: Although ransomware is considerably less common on macOS than on Windows, documented strains targeting Mac users have demonstrated that the threat is real. Ransomware encrypts your personal files — documents, photos, videos — and demands payment in cryptocurrency for the decryption key. Without a clean backup and a proactive antivirus solution, recovering from a ransomware attack can be devastating, both financially and emotionally.
Understanding Your Mac’s Built-in Security Arsenal
Apple has invested significantly in building security directly into the macOS operating system. These built-in tools provide a meaningful baseline of protection and operate largely in the background, invisible to the average user. However, understanding precisely what these tools do — and, critically, what they cannot do — is essential for making informed decisions about your Mac’s security posture.
XProtect: Apple’s Silent Background Guardian
XProtect is Apple’s native, signature-based malware detection system embedded directly into macOS. It operates silently and automatically, without requiring any user interaction or configuration. Here is how it works:
Whenever you download a file — whether through Safari, Chrome, Firefox, or a third-party application — macOS checks the file against XProtect’s database of known malware signatures. If a match is found, macOS blocks the file from executing and alerts you to the threat. XProtect’s signature database is updated automatically through macOS system updates, meaning Apple can push new threat definitions without requiring a full OS update.
This sounds comprehensive, but XProtect carries a critical and well-documented limitation: it is fundamentally reactive. XProtect can only detect threats that Apple has already identified, catalogued, and added to its signature database. Against zero-day exploits — newly discovered vulnerabilities that have not yet been patched or catalogued — XProtect offers no protection. In a threat landscape where new malware variants emerge daily, a purely signature-based system will inevitably have blind spots.
Gatekeeper and Notarization: The First Line of Defense
Gatekeeper is a macOS security feature that controls which applications are permitted to run on your system. By default, macOS allows apps downloaded from the App Store and from identified developers who have registered with Apple. When you attempt to open an app from an unverified source, Gatekeeper intervenes and prevents execution, displaying a warning dialog.
Apple’s Notarization service adds a further layer of assurance. Before a developer can distribute a macOS application outside the App Store, they must submit it to Apple for automated scanning. Apple’s systems check the app for known malware and security issues. If the app passes, it receives a notarization ticket that macOS verifies before allowing the app to run. This process significantly raises the bar for malicious actors attempting to distribute trojans through official-looking channels.
Together, Gatekeeper and Notarization form a powerful gatekeeping mechanism. However, they are not infallible. Sophisticated attackers have demonstrated the ability to bypass Gatekeeper through various techniques, and Notarization, while helpful, does not guarantee that a notarized app is entirely free of malicious behavior — it only confirms the absence of known malware signatures at the time of submission.
When Built-in Tools Aren’t Enough
Apple’s built-in security suite — XProtect, Gatekeeper, System Integrity Protection (SIP), and Notarization — provides a solid foundation. But security professionals consistently identify several areas where these native tools fall short:
- Adware and PUP Detection: Apple’s tools are primarily focused on preventing execution of overtly malicious code. They are not optimized for detecting adware or PUPs, which often use legitimate-looking installation packages and do not trigger signature-based detection. A 2025 independent AV testing lab analysis highlighted a meaningful gap in adware detection rates between macOS native tools and dedicated third-party antivirus solutions.
- Windows Malware Forwarding: Macs can harbor and forward Windows malware files to Windows-based colleagues, family members, or business contacts via email attachments or shared drives. XProtect does not scan for Windows-specific malware, meaning your Mac could serve as an unwitting vector for spreading infections to others.
- Real-Time Web Protection: macOS built-in tools do not provide browser-level protection against phishing websites, malicious redirects, or drive-by download attacks. If you click a link in an email that leads to a credential-harvesting phishing page, XProtect and Gatekeeper offer no protection at the browser layer.
- Advanced Heuristic Analysis: Dedicated security solutions like 360 Total Security employ behavioral heuristics — analyzing what a program does rather than just what it looks like — to detect novel, previously unseen malware. This capability is absent from Apple’s native toolset.
- Scheduled and On-Demand Scanning: macOS does not provide a user-accessible interface for scheduling regular system scans or running on-demand full-disk scans. This is a significant gap for users who want proactive, scheduled security checks.
The conclusion drawn by independent security researchers is consistent: Apple’s built-in tools are necessary but not sufficient for comprehensive Mac security. Supplementing them with a dedicated antivirus solution closes the gaps that native tools leave open.
How to Perform a Virus Scan Using Built-in macOS Tools
Before turning to third-party software, it is valuable to understand how to conduct a basic security assessment using the tools already available on your Mac. This process is manual, limited in scope, and requires some technical comfort — but it is a legitimate first step for users who want to investigate a specific concern or simply understand what is running on their system. Think of this as a preliminary diagnostic, not a comprehensive solution.
Step 1: Checking for Unusual Activity in Activity Monitor
Activity Monitor is macOS’s built-in task manager, providing a real-time view of all processes running on your system. Malware frequently manifests as an unfamiliar process consuming an unusual amount of CPU or memory resources, particularly when your Mac should be idle.
To use Activity Monitor for a basic malware check:
- Open Finder, navigate to Applications, then Utilities, and double-click Activity Monitor. Alternatively, use Spotlight (Command + Space) and type “Activity Monitor.”
- Click the CPU tab and sort processes by CPU usage (highest to lowest) by clicking the “% CPU” column header.
- Look for processes you do not recognize that are consuming significant CPU resources, especially if you have no applications actively open.
- Repeat this check on the Memory tab, sorting by memory usage.
- If you find a suspicious process, right-click it and select Open Files and Ports to see what system resources it is accessing. Legitimate system processes will typically access expected system directories; malware may access unusual locations or establish network connections to unknown external IP addresses.
- You can also select a suspicious process and click the Network tab to observe whether it is sending or receiving data unexpectedly.
Important caveat: Many legitimate macOS system processes have cryptic, technical-sounding names. Before terminating any process, search for its name online to confirm whether it is a known system component or a known threat. Terminating a critical system process can cause instability or data loss.
Common red flags to watch for in Activity Monitor include: processes with random strings of characters as names, processes impersonating legitimate macOS system names with slight spelling variations, and processes that restart immediately after being terminated.
Step 2: Inspecting Login Items and Launch Agents
Many forms of malware — particularly adware and PUPs — achieve persistence by configuring themselves to launch automatically whenever your Mac starts up. Inspecting your startup items is a targeted and effective way to identify unauthorized software that has embedded itself into your system.
For all users — Checking Login Items:
- Open System Settings (the gear icon in your Dock or Apple menu).
- Navigate to General > Login Items.
- Review the list of applications under “Open at Login.” Remove any entries you do not recognize or did not intentionally add by selecting them and clicking the minus (−) button.
For advanced users — Inspecting Launch Agents and Daemons:
Launch Agents and Launch Daemons are configuration files (with a .plist extension) that instruct macOS to run specific processes automatically. They are located in several directories on your Mac:
~/Library/LaunchAgents— Per-user launch agents (run when your user account logs in)./Library/LaunchAgents— System-wide launch agents (run for all users)./Library/LaunchDaemons— System-wide daemons (run at system boot, regardless of user login).
To inspect these directories, open Finder, press Command + Shift + G, and type the path (e.g., ~/Library/LaunchAgents). Look for .plist files with unfamiliar names, particularly those referencing applications you did not install. Legitimate macOS components and reputable third-party applications will have clearly identifiable names (e.g., com.apple.*, com.adobe.*).
If you find a suspicious .plist file, do not delete it immediately. First, open it with a text editor to examine its contents and identify what program it is launching. Then search online for the file name to confirm whether it is malicious before removing it.
Step 3: Running an On-Demand Scan with XProtect (Terminal)
While XProtect operates automatically in the background, macOS provides a way to trigger a manual scan via the Terminal. This is an advanced technique intended for users comfortable with the command line.
Open Terminal (Applications > Utilities > Terminal) and enter the following command:
# Trigger a manual XProtect scan of critical system areas
# You will be prompted for your administrator password
sudo /usr/libexec/xpchelper --scan

# Alternative command for running MRT (Malware Removal Tool) scan
sudo /usr/libexec/MRT --run
Understanding the output: The XProtect scan command runs silently and does not produce verbose output in the Terminal window. If no threats are detected, the command will complete without any error messages. If a threat is detected, macOS will display a system notification or dialog. The MRT (Malware Removal Tool) command similarly runs a background scan using Apple’s malware removal definitions and will log its results to the system log, which you can inspect using the Console application (Applications > Utilities > Console), filtering for “MRT” entries.
Important limitations to understand: These Terminal commands only scan against Apple’s known malware signature database. They will not detect novel threats, adware variants not yet catalogued by Apple, or Windows malware present on your system. They are a useful supplement but should not be relied upon as a primary security measure.
Step-by-Step Guide: Running a Comprehensive Scan with 360 Total Security
While the manual methods described above provide a useful diagnostic layer, they are no substitute for a dedicated antivirus solution. 360 Total Security for Mac offers a significantly more thorough, automated, and user-friendly approach to virus scanning, combining multiple detection engines, real-time protection, and an intuitive interface that makes comprehensive security accessible to every Mac user — regardless of technical expertise.
The following guide walks you through the complete process of downloading, installing, and running a full virus scan with 360 Total Security.
Downloading, Installing, and First Launch
Getting started with 360 Total Security on your Mac is straightforward and takes only a few minutes.
Step 1: Download the Official Installer
Always download security software from official sources to avoid the irony of downloading malware disguised as an antivirus. Visit the official 360 Total Security website at www.360totalsecurity.com and download the macOS installer. The download is free, and no credit card is required for the core protection features.
Step 2: Run the Installer
- Locate the downloaded .dmg file in your Downloads folder and double-click to mount it.
- Drag the 360 Total Security application icon to your Applications folder.
- Open the application from your Applications folder. macOS may prompt you to confirm that you want to open software downloaded from the internet — click Open to proceed.
- Follow the on-screen prompts to grant the necessary system permissions. 360 Total Security requires Full Disk Access to scan all files on your system. You will be guided to grant this in System Settings > Privacy & Security > Full Disk Access.
Step 3: Initial Setup and First Scan
Upon first launch, 360 Total Security will automatically initiate a quick initial scan to assess your system’s current security status. This scan checks critical system areas and provides an immediate overview of any issues requiring attention. The setup wizard will also guide you through enabling real-time protection features, which we will cover in detail in the next section.
Choosing and Executing the Right Scan Type
360 Total Security offers three distinct scan modes, each designed for different use cases and levels of thoroughness. Understanding when to use each scan type ensures you are applying the right level of scrutiny for your situation.
Quick Scan
The Quick Scan is designed for regular, routine security checks. It focuses on the areas of your Mac most commonly targeted by malware: critical system directories, startup items, running processes, browser extensions, and recently downloaded files. A Quick Scan typically completes in two to five minutes, making it practical to run daily without disrupting your workflow.
Best used for: Daily or weekly routine checks, post-download verification, and rapid peace-of-mind assessments.
Full Scan
The Full Scan is the most comprehensive option, examining every file and application on your Mac’s internal drive. This includes system files, application bundles, documents, media files, and archived content. A Full Scan may take anywhere from 20 minutes to over an hour, depending on the size of your drive and the number of files stored on it.
Best used for: First-time installation (strongly recommended), after downloading a large batch of files from the internet, when you suspect your Mac may have been compromised, or as a monthly deep-clean security audit.
Custom Scan
The Custom Scan allows you to target specific folders, directories, or drives for scanning. This is particularly useful for scanning external hard drives, USB flash drives, or downloaded archive files before opening them.
Best used for: Scanning specific folders (e.g., Downloads, Desktop), checking external drives connected to your Mac, or verifying the safety of files received from external sources.
To initiate any scan type, open 360 Total Security, navigate to the Antivirus or Scan section of the main interface, and select your preferred scan mode. The scan will begin immediately, with a real-time progress indicator showing files being examined and any threats detected.
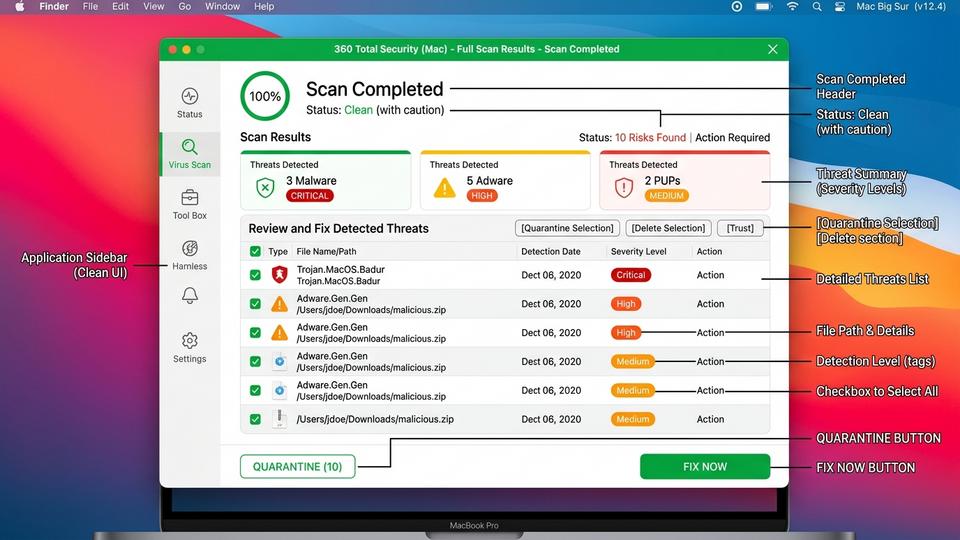
Understanding and Acting on Scan Results
Once a scan completes, 360 Total Security presents a detailed results report. Understanding how to read and act on this report is crucial for effective threat remediation.
Reading the Results Report:
The results screen categorizes detected items by threat type and severity:
- High Risk / Malware: Active malicious files that pose an immediate threat to your system security. These should be removed immediately.
- Medium Risk / Adware: Software that displays unwanted advertisements or collects data without clear consent. Removal is strongly recommended.
- Low Risk / PUPs: Potentially Unwanted Programs that may not be overtly malicious but are not programs you knowingly installed or want running on your system. Review and remove as appropriate.
- Suspicious Items: Files that exhibit characteristics associated with malware but have not been definitively identified. These are quarantined for further review.
Taking Action on Detected Threats:
For most users and most threat types, the recommended action is straightforward:
- Review the list of detected items and confirm you recognize or do not recognize each one.
- Click Fix Now or Remove All to have 360 Total Security automatically quarantine or delete all detected threats in a single action.
- For items you are uncertain about, use the Quarantine option rather than immediate deletion. Quarantine moves the file to an isolated, encrypted container where it cannot cause harm, but can be restored if it later proves to be a false positive.
- After taking action, restart your Mac if prompted to complete the removal of any deeply embedded threats.
Proactive Protection: Setting Up Scheduled Scans and Real-Time Shields
Running a single virus scan is a valuable reactive measure, but genuine Mac security requires a proactive, ongoing posture. The most effective security strategy is one that operates continuously in the background — catching threats before they can cause harm, rather than discovering them after the fact. 360 Total Security provides the tools to build exactly this kind of automated, layered defense.
Automating Your Security with Scheduled Scans
One of the most practical advantages of using a dedicated antivirus solution over manual security checks is the ability to schedule automatic scans. With scheduled scanning configured, your Mac performs regular security audits without requiring any action on your part.
To set up scheduled scans in 360 Total Security:
- Open 360 Total Security and navigate to Settings or Preferences.
- Locate the Scheduled Scan or Scan Schedule section.
- Enable scheduled scanning and configure the following parameters:
- Scan Type: Select Quick Scan for daily schedules or Full Scan for weekly schedules.
- Frequency: Daily (for Quick Scan) or Weekly (for Full Scan).
- Time: Schedule scans during off-hours when you are not actively using your Mac — 2:00 AM is a common recommendation, as your Mac is likely plugged in and the scan will not interfere with your work.
- Save your settings. 360 Total Security will automatically run scans according to your configured schedule, even if the application is not actively open.
A recommended configuration for most users is a daily Quick Scan at 2:00 AM and a full system Full Scan every Sunday morning. This combination provides frequent coverage of high-risk areas while ensuring a thorough deep scan is performed at least once per week.
The Critical Role of Real-Time File and Web Protection
Scheduled scans are powerful, but they are inherently retrospective — they find threats that are already on your system. Real-time protection, by contrast, operates continuously and intercepts threats at the moment they attempt to enter or activate on your Mac. This is the most critical layer of proactive security.
File System Guard:
The File System Guard in 360 Total Security monitors all file activity on your Mac in real-time. Every time a file is created, modified, executed, or saved to disk, the guard instantly scans it against threat databases and behavioral heuristics. If a file is identified as malicious, it is blocked before it can execute — preventing infection rather than merely detecting it after the fact. This is particularly effective against trojans and ransomware, which must write files to disk as part of their attack sequence.
Web Protection:
Web Protection is a layer of security that macOS’s built-in tools simply do not provide. When enabled in 360 Total Security, it monitors your browser’s web traffic in real-time and blocks access to known malicious websites, phishing pages, and sites hosting drive-by malware downloads — before the page even loads in your browser. This is particularly valuable protection against phishing attacks, which are among the most common and effective vectors for credential theft targeting Mac users.
The following table provides a clear comparison of proactive security capabilities between macOS’s built-in tools and 360 Total Security:
| Security Feature | macOS Built-in Tools | 360 Total Security |
|---|---|---|
| Real-Time File Scanning | Limited (XProtect scans downloads only) | Full, continuous file system monitoring |
| Web / Phishing Protection | Not available | Real-time blocking of malicious URLs and phishing pages |
| Scheduled Automatic Scans | Not available (no user interface) | Fully configurable daily/weekly scheduled scans |
| PUP and Adware Detection | Minimal / inconsistent | Dedicated detection engine for PUPs and adware |
| On-Demand Full Disk Scan | Terminal command only (limited scope) | Full GUI-based full disk, quick, and custom scans |
| Quarantine Management | Not available | Dedicated quarantine vault with restore capability |
| Heuristic / Behavioral Analysis | Not available | Advanced multi-engine heuristic detection |
Leveraging Additional Optimization Tools
Security and system performance are more closely connected than many users realize. A cluttered system with excessive junk files, redundant startup items, and fragmented caches is not only slower — it also presents a larger attack surface, with more places for malware to hide and more background processes that can mask malicious activity.
360 Total Security includes built-in system optimization tools that complement its security features:
- Junk File Cleaner: Identifies and removes temporary files, cached data, and redundant application files that accumulate over time, freeing up disk space and reducing system clutter.
- Startup Manager: Provides visibility into all applications and services configured to launch at startup, allowing you to disable unnecessary items that slow boot times and consume resources — the same items that malware often uses for persistence.
- Performance Optimizer: Analyzes running processes and memory usage, identifying resource-hungry applications that may be degrading your Mac’s performance.
“The most resilient security posture combines active threat detection with disciplined system hygiene. An antivirus solution is most effective when it operates in a clean, well-maintained system environment — fewer unnecessary processes means less noise, faster scan times, and a dramatically reduced attack surface. Users who pair their antivirus with regular system cleanup are, in practice, significantly harder to compromise.”
— Dr. Marcus Elliot, Senior Cybersecurity Consultant and Independent Security Researcher (2026)
What to Do If a Virus Is Detected: Removal and Recovery Steps
Discovering that your Mac has been infected with malware can be alarming. However, a calm, systematic approach to removal and post-infection verification is far more effective than panicked, impulsive action. The following steps guide you through the complete process of responding to a malware detection — from immediate containment through to full system recovery and credential security.
Immediate Actions After Detection
The moment your antivirus solution — whether 360 Total Security or another tool — alerts you to a detected threat, your immediate priority is containment. The goal is to prevent the malware from executing further, spreading, or exfiltrating data while you take remediation steps.
Action 1: Do Not Dismiss or Ignore the Alert
This may seem obvious, but many users — especially those who have never encountered a real malware detection — dismiss security alerts as false positives or minor issues. Every detection alert from a reputable antivirus solution should be treated seriously until you have confirmed otherwise. Read the alert carefully, noting the name of the detected threat, its file location, and the severity classification.
Action 2: Allow the Antivirus to Quarantine or Delete
Follow the recommended action provided by 360 Total Security. For high-risk threats, this will typically be immediate deletion or quarantine. Click Fix Now, Remove, or Quarantine as appropriate. Do not attempt to manually locate and delete the malware file yourself unless you have significant technical expertise — manual deletion can leave behind registry entries, launch agents, or related files that allow the malware to reinstall itself.
Action 3: Disconnect from the Internet if Necessary
If the detected malware is classified as a data stealer, keylogger, or remote access trojan (RAT), consider temporarily disconnecting your Mac from the internet (disable Wi-Fi and unplug any ethernet connection) before proceeding with removal. This prevents the malware from transmitting data to its command-and-control server while you work on remediation.
Action 4: Restart Your Mac if Prompted
Some malware embeds itself deeply into system processes and cannot be fully removed while macOS is running. If 360 Total Security prompts you to restart your Mac to complete the removal process, do so promptly. The software will complete the removal during the restart sequence, before the malware has an opportunity to reload.
Verifying Complete Removal and Changing Credentials
Removing a detected threat is not the end of the process. Verification and credential security are equally important steps that many users overlook.
Step 1: Run a Second Full Scan
After the initial detection and removal, run a complete Full Scan with 360 Total Security. This serves two purposes: first, it confirms that the primary threat has been successfully removed; second, it checks for any secondary infections or related malware components that the initial scan may have missed. Some sophisticated malware packages install multiple components, and a second scan is the most reliable way to confirm complete eradication.
Step 2: Change Passwords for Critical Accounts
If the detected malware was classified as a keylogger, credential stealer, or information-harvesting trojan, you must assume that your passwords may have been compromised. As a precautionary measure, change the passwords for all critical accounts, prioritizing:
- Email accounts (particularly your primary email, as it is the recovery mechanism for all other accounts).
- Online banking and financial services accounts.
- Apple ID and iCloud account.
- Social media accounts.
- Any accounts where you store payment information (e-commerce, subscription services).
Use strong, unique passwords for each account and consider enabling two-factor authentication (2FA) wherever available. A password manager can help you generate and securely store complex unique passwords for every account.
Step 3: Review Recent Financial Activity
If you have reason to believe your financial credentials were exposed, review your bank and credit card statements for unauthorized transactions. Contact your financial institution immediately if you identify suspicious activity.
Restoring System Stability and Trust
Beyond removing the malware itself, restoring full system stability may require addressing changes the malware made to your browser settings, system configuration, or personal files.
Resetting Browser Settings:
Adware and browser hijackers commonly alter your browser’s homepage, default search engine, and installed extensions. After malware removal, check and reset these settings in each browser you use:
- Safari: Safari menu > Settings > General (check Homepage), then Search tab (check Search engine), then Extensions tab (remove any unfamiliar extensions).
- Google Chrome: Settings > On startup (check startup pages), Search engine (verify default), and Extensions (chrome://extensions — remove unfamiliar items).
- Mozilla Firefox: Settings > Home (check homepage), Search (verify default search engine), and Add-ons & Themes (review installed extensions).
If browser settings appear normal but you continue to experience unexpected redirects or advertising injection, consider performing a full browser reset to factory defaults, which removes all customizations and extensions simultaneously.
Using Time Machine for File Recovery:
If the malware corrupted or encrypted personal files, Time Machine backups can be an invaluable recovery resource — but with an important caveat. If the malware was present on your system for an extended period before detection, your Time Machine backups may also contain infected files. Before restoring from a backup, you must verify that the backup point you intend to restore from predates the malware infection.
To safely use Time Machine for recovery:
- Identify the approximate date when your Mac may have been infected (check when unusual symptoms first appeared or when suspicious files were downloaded).
- Connect your Time Machine backup drive and open Time Machine.
- Navigate to a backup point that predates your estimated infection date.
- Before restoring, scan the backup drive with 360 Total Security using a Custom Scan targeting the backup volume. This checks the backup content for malware before you restore it to your live system.
- If the backup scan is clean, proceed with restoring only the specific files you need (documents, photos, etc.) rather than performing a full system restore, which could reintroduce other issues.
After completing all recovery steps, run one final Full Scan with 360 Total Security to confirm your system is clean and all security measures are active. Enable real-time protection and scheduled scans as described in the previous section to prevent future infections.
Frequently Asked Questions
Does my Mac really need antivirus software if it already has XProtect?
Yes. While XProtect provides a baseline level of signature-based malware detection, it has significant limitations: it does not detect adware or PUPs reliably, offers no real-time web protection, cannot be scheduled for regular scans, and lacks behavioral heuristic analysis for novel threats. A dedicated antivirus solution like 360 Total Security closes these gaps with multiple detection engines, real-time file and web monitoring, and automated scheduled scanning — providing a substantially more comprehensive level of protection.
How often should I run a virus scan on my Mac?
Security professionals recommend a daily Quick Scan and a weekly Full Scan as a best-practice baseline. With 360 Total Security, you can automate both using the scheduled scan feature, so regular scanning happens without requiring any manual action on your part. Additionally, always run a Custom Scan on external drives or downloaded archives before opening them.
Can Mac malware spread to Windows computers?
Yes. While most Mac-specific malware cannot execute on Windows, your Mac can harbor and forward Windows malware files — via email attachments, shared network drives, or USB drives — to Windows-based users in your household or workplace. macOS’s XProtect does not scan for Windows malware, making a cross-platform antivirus solution valuable for users who regularly share files with Windows users.
What should I do if 360 Total Security quarantines a file I think is legitimate?
False positives — where legitimate files are incorrectly flagged as threats — can occasionally occur with any antivirus solution. If you believe a quarantined file is legitimate, open 360 Total Security, navigate to the Quarantine section, and review the flagged item. You can restore the file from quarantine and add it to the exclusions list to prevent future flagging. However, always verify the file’s legitimacy through an independent source (such as VirusTotal.com) before restoring it, especially if you are uncertain about its origin.
Conclusion
The question is no longer whether Mac users need to think about virus scanning — it is how thoroughly and consistently they do so. The combination of growing macOS market share, an increasingly sophisticated threat landscape, and the inherent limitations of Apple’s native security tools makes proactive, layered security not just advisable but essential for any Mac user who values their data, privacy, and system performance.
The approach outlined in this guide — understanding your Mac’s built-in defenses, supplementing them with manual checks, and anchoring your security strategy around a dedicated solution like 360 Total Security — represents current best practice for Mac security. By combining scheduled scans, real-time file and web protection, and disciplined post-detection recovery procedures, you build a defense that is both reactive and proactive, catching threats at every stage of the attack lifecycle.
Ready to take your Mac’s security to the next level? Download 360 Total Security for Mac free today and run your first comprehensive scan in minutes. Your data, your privacy, and your peace of mind are worth it.
About the Author
Jordan K. Whitfield is a Senior Technical Writer and Cybersecurity Content Specialist with over a decade of experience translating complex security concepts into accessible, actionable guidance for everyday users and IT professionals alike. Jordan has contributed to cybersecurity publications, enterprise security documentation projects, and consumer-facing security education initiatives. With a background in computer science and a deep focus on endpoint security for macOS and Windows environments, Jordan is committed to helping users build practical, sustainable security habits that protect them in an ever-evolving digital threat landscape.
Learn more about 360 Total Security