Executive Summary: Temporarily disabling virus protection on Windows 11 is occasionally necessary for legitimate technical tasks — from resolving software conflicts to running controlled security audits. However, this action exposes your system to serious risks, including malware, ransomware, and network intrusions. This comprehensive guide walks you through every safe, step-by-step method for temporarily turning off Windows Defender or third-party antivirus software like 360 Total Security, explains the safest alternative (using exclusions), and provides a critical post-disable checklist to ensure your system remains secure throughout the entire process.
Why Would You Want to Temporarily Disable Virus Detection on Windows 11?
Temporarily disabling virus detection is a legitimate, advanced system management action — but it is not something to be taken lightly. Whether you are troubleshooting a software conflict, testing an application installation, or performing a specific security audit, understanding why you need to do this and what risks you are accepting is the essential first step. Done improperly, disabling your antivirus even for a few minutes can have lasting consequences for your system’s security posture.
Common Legitimate Scenarios for Temporary Disabling
There are several well-documented, professionally accepted reasons why a power user or IT administrator might need to temporarily suspend antivirus activity on a Windows 11 machine:
- False Positive Conflicts: Certain developer tools, legacy business applications, or niche utilities are incorrectly flagged as threats by antivirus engines. This is a well-known issue in the software development community, where build tools, debuggers, or packet analyzers may trigger heuristic detection rules without actually being malicious.
- Performance and System Conflict Troubleshooting: Real-time scanning can occasionally interfere with high-I/O applications, disk-intensive operations, or specific hardware drivers. Temporarily disabling protection helps isolate whether the antivirus is the root cause of a system slowdown or crash.
- Controlled Security Testing: Penetration testers and security researchers sometimes need to run vulnerability scanners or exploit simulation tools in a controlled, isolated environment. These tools may be blocked by resident antivirus software, requiring a temporary suspension to complete the audit.
The Critical Risks and Security Implications
Before proceeding with any method described in this guide, you must fully understand the security implications. The risks are real, measurable, and can have permanent consequences:
- Immediate Vulnerability Window: The moment real-time protection is disabled, your system is exposed to malware, ransomware, spyware, and network-based attacks. According to a 2026 Cybersecurity Threat Intelligence Report, systems with disabled endpoint protection are compromised on average within under 4 minutes of exposure on an unsecured network.
- Residual Security Gaps: Even after re-enabling antivirus protection, certain threats — particularly rootkits or fileless malware — may have embedded themselves in memory or startup sequences during the unprotected window, making them harder to detect post-re-enablement.
- Policy and Compliance Violations: In enterprise environments, disabling endpoint protection — even temporarily — can violate organizational IT security policies, HIPAA, PCI-DSS, ISO 27001, or other compliance frameworks. Always consult your IT department before proceeding in a managed environment.
Best Practices Before You Proceed
If, after weighing the risks, you have determined that temporarily disabling your virus protection is truly necessary, follow these preparatory best practices without exception:
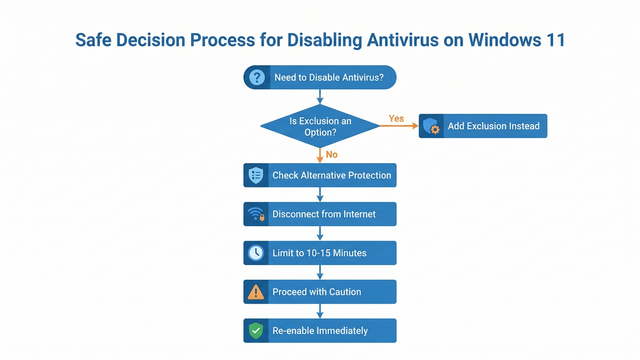
- Establish Alternative Protection: Ensure you have a secondary security layer active, such as a hardware firewall or a network-level threat filter, before disabling your primary endpoint protection.
- Minimize Duration: Limit the disabled period to the absolute minimum required — ideally 10 to 15 minutes for a standard software installation. Never leave protection disabled overnight or across a reboot.
- Isolate Your Network: Disconnect from public Wi-Fi or open networks. If possible, physically unplug your Ethernet cable or disable your Wi-Fi adapter in Device Manager before disabling your antivirus.
- Close Unnecessary Applications: Reduce your attack surface by closing browsers, email clients, and any application with network access before proceeding.
How to Temporarily Turn Off Windows Defender Antivirus on Windows 11
Windows Defender — now formally branded as Microsoft Defender Antivirus — is deeply integrated into Windows 11’s security architecture. Disabling it requires navigating through the Windows Security app with administrator permissions. This is by design: Microsoft has deliberately made the process non-trivial to prevent accidental or malicious disabling by unauthorized users.
Step-by-Step Guide Through Windows Security
The most straightforward and officially supported method for temporarily disabling real-time protection in Windows 11 is through the Windows Security application:
- Step 1: Open Windows Security by clicking the Start menu and searching for “Windows Security,” or navigate via
Settings > Privacy & security > Windows Security > Open Windows Security. - Step 2: In the Windows Security dashboard, click on Virus & threat protection from the left-hand navigation panel.
- Step 3: Scroll down to the Virus & threat protection settings section and click the Manage settings link directly beneath it.
- Step 4: Locate the Real-time protection toggle. Click it to switch it from On to Off. A User Account Control (UAC) dialog will appear requesting administrator confirmation — click Yes to proceed.
- Step 5: A warning banner will appear at the top of the screen confirming that real-time protection is disabled. Note the time and proceed immediately with your intended task.
Important: Windows 11 is designed to automatically re-enable Real-time protection after a short period (typically after the next system reboot or after a scheduled task runs). Do not rely on this auto-restore as your safety net — always manually re-enable protection as soon as your task is complete.
Using the Registry or Group Policy (Advanced Methods)
Warning: The following methods are strictly for advanced users and system administrators. Incorrect registry modifications can destabilize your operating system, corrupt system files, or create persistent security vulnerabilities. Proceed only if you have a full system backup and understand the implications.
Registry Method: Windows Defender’s core service can be influenced via the Windows Registry. The relevant key is located at a protected path that requires elevated privileges and, in some Windows 11 configurations, may be blocked by Tamper Protection (which must be disabled first via the Windows Security UI).
; Registry path for Windows Defender configuration
; WARNING: Modifying this key incorrectly can break system security
; Requires Tamper Protection to be OFF first

Registry Key Path:
HKEY_LOCAL_MACHINE\SOFTWARE\Policies\Microsoft\Windows Defender

Value Name: DisableAntiSpyware
Value Type: DWORD (32-bit)
Value Data: 1  (to disable) | 0  (to re-enable)

; To apply via Command Prompt (Run as Administrator):
reg add "HKLM\SOFTWARE\Policies\Microsoft\Windows Defender" /v DisableAntiSpyware /t REG_DWORD /d 1 /f

; To re-enable:
reg add "HKLM\SOFTWARE\Policies\Microsoft\Windows Defender" /v DisableAntiSpyware /t REG_DWORD /d 0 /f

; CRITICAL: Always re-enable Tamper Protection after completing your task.
; This method is NOT recommended for standard users.
Group Policy Method (Windows 11 Pro/Enterprise only): Open the Local Group Policy Editor by pressing Win + R, typing gpedit.msc, and pressing Enter. Navigate to Computer Configuration > Administrative Templates > Windows Components > Microsoft Defender Antivirus. Double-click Turn off Microsoft Defender Antivirus and set it to Enabled. Apply and close. Remember to reverse this setting immediately after completing your task.
Important Notes and Limitations
- Auto-Reactivation: Windows 11 will automatically attempt to re-enable Microsoft Defender after a reboot or after Windows Security Center detects a period of inactivity. This is a safety feature, not a bug.
- Firewall Independence: Disabling real-time protection through the Virus & threat protection settings does not disable the Windows Firewall. These are separate components — do not attempt to disable the firewall as an additional step, as this dramatically increases your attack surface.
- Enterprise Alerts: In domain-joined or Intune-managed environments, disabling Defender will immediately trigger alerts to your IT security operations center (SOC). Be prepared to explain and document your actions.
How to Pause or Configure Third-Party Antivirus Software (Like 360 Total Security)
Third-party antivirus programs are often designed with power users in mind, offering more granular, user-friendly controls for temporary protection suspension compared to the relatively rigid Windows Defender interface. 360 Total Security, one of the world’s most widely used free antivirus platforms for Windows PC, exemplifies this philosophy with its intuitive pause controls and modular protection architecture.
The Advantage of Using a Dedicated Security Suite
When you need to temporarily suspend protection for a legitimate task, using a dedicated security suite like 360 Total Security offers several critical advantages over relying solely on Windows Defender:
- Timer-Based Pause: 360 Total Security offers a built-in timed pause feature, allowing you to suspend protection for a defined period (e.g., 10 minutes, 30 minutes, or until restart). This eliminates the risk of forgetting to re-enable protection manually.
- Modular Suspension: Rather than disabling all protection at once, 360 Total Security allows you to suspend specific modules — such as real-time file scanning — while keeping other layers like behavioral monitoring or network protection active. This dramatically reduces your exposure window.
- Clear Visual Status Indicators: The interface provides unambiguous, color-coded status indicators (e.g., a red shield icon with a countdown timer) that make it immediately obvious your protection is paused, reducing the risk of working in an unprotected state unknowingly.
Step-by-Step: Pausing Protection in 360 Total Security
Follow these steps to safely and temporarily pause protection in 360 Total Security on your Windows 11 PC:
- Step 1: Open the 360 Total Security main interface from your desktop shortcut or the system tray icon.
- Step 2: Locate the Protection Status area, typically displayed prominently on the home screen with a shield icon and a green “Protected” status label.
- Step 3: Click on the shield icon or look for a Pause or Disable Protection option. A dialog box will appear offering duration options — select the shortest duration that covers your task (e.g., Pause for 10 minutes).
- Step 4: Confirm the action. The interface will update to show a paused or reduced-protection state, typically with an orange or red indicator and a visible countdown timer.
- Step 5: Proceed immediately with your intended task. When the timer expires, 360 Total Security will automatically restore full protection without any manual intervention required.
| Feature | Windows Defender (Built-in) | 360 Total Security |
|---|---|---|
| User-Friendly Pause Control | Basic toggle (On/Off only) | Intuitive pause button with duration options |
| Timed Auto Re-enable | Reboot-triggered only (not user-set) | User-defined timer (10 min, 30 min, etc.) |
| Module-Level Control | Limited (all-or-nothing for real-time) | Granular (pause specific engines/modules) |
| Visual Status Indicator | Banner notification in Security app | Prominent shield icon with countdown timer |
| Admin Permission Required | Yes (UAC prompt) | Yes (standard security confirmation) |
| Platform Support | Windows only | Windows & macOS (Desktop/PC) |
Post-Pause Best Practices with Third-Party Software
- Set an Independent Timer: Even with a built-in countdown, set a separate phone or desktop timer to match your pause duration as a redundant reminder.
- Act Immediately: Perform your installation, test, or audit task the moment protection is paused. Do not browse the web, check email, or perform any other activities during this window.
- Verify Auto Re-enablement: Once the timer expires, confirm in the 360 Total Security interface that the protection status has returned to Protected (green). Do not assume it has re-enabled without checking.
- Run a Quick Scan: After re-enabling, immediately run a targeted quick scan on the directory or files you interacted with during the pause period to confirm no threats were introduced.
The Safest Alternative: Creating Exclusions Instead of Disabling Protection
In the vast majority of cases where users feel compelled to disable their antivirus, there is a far safer, professionally recommended alternative: creating an exclusion. An antivirus exclusion tells your security software to ignore a specific file, folder, file type, or process — allowing your trusted item to operate freely while keeping all other system protections fully active. This is the method used by IT administrators worldwide for deploying trusted but falsely flagged software at enterprise scale.
Why Exclusions Are the Professional Recommended Approach
Security professionals and enterprise IT teams consistently recommend exclusions over full protection disabling for several compelling reasons:
- Continuous System-Wide Protection: Adding an exclusion for a single file or folder does not reduce protection for any other part of your system. Your network connections, browser activity, email, and all other files remain fully monitored.
- No Re-enablement Risk: Since you never actually disabled your antivirus, there is zero risk of forgetting to turn it back on — one of the most common and dangerous mistakes users make.
- Standard Enterprise Practice: As noted in a 2025 Enterprise Endpoint Security Best Practices Framework, “Targeted exclusions for verified, signed executables are the preferred method for resolving false positive conflicts in production environments, as they preserve compliance posture while eliminating operational friction.”
- Auditable and Reversible: Exclusion lists are logged, manageable, and easily reversed. You can review, edit, or remove any exclusion at any time without impacting overall system security.
How to Add Exclusions in Windows Defender
Adding an exclusion in Microsoft Defender Antivirus on Windows 11 is a straightforward process:
- Step 1: Open Windows Security and navigate to Virus & threat protection.
- Step 2: Under Virus & threat protection settings, click Manage settings.
- Step 3: Scroll down to the Exclusions section and click Add or remove exclusions. A UAC prompt will appear — click Yes.
- Step 4: Click the + Add an exclusion button. You can choose to exclude a File, Folder, File type, or Process. For a specific installer, choose File and navigate to its path. For a development workspace, choose Folder.
- Step 5: Confirm your selection. The exclusion will appear in the list and take effect immediately. You can remove it at any time by clicking the exclusion and selecting Remove.
; Example: Adding a folder exclusion via PowerShell (Run as Administrator)
; Replace the path with your actual trusted folder path

Add-MpPreference -ExclusionPath "C:\MyTrustedDevFolder\"

; To verify current exclusions:
Get-MpPreference | Select-Object -ExpandProperty ExclusionPath

; To remove a specific exclusion:
Remove-MpPreference -ExclusionPath "C:\MyTrustedDevFolder\"
How to Add Exclusions in 360 Total Security
360 Total Security provides an equally capable and often more intuitive exclusion management system:
- Step 1: Open the 360 Total Security main interface and navigate to Settings (typically a gear icon in the top-right corner) or Advanced Settings.
- Step 2: Look for the Exclusions, Trusted Zone, or Whitelist section within the settings menu.
- Step 3: Click Add and specify the file, folder, or process you wish to exclude. 360 Total Security’s interface provides a file browser for easy navigation to the target item.
- Step 4: Save your settings. The excluded item will now be bypassed by 360 Total Security’s scanning engines while all other protections remain fully active. This leverages one of 360 Total Security‘s key strengths: a clear, well-organized trust management system that makes maintaining your exclusion list straightforward even for non-technical users.
If you are frequently encountering false positives or need robust, configurable exclusion management, consider making 360 Total Security your primary desktop security solution. Its combination of multi-engine detection, granular control, and user-friendly interface makes it an ideal choice for both home users and professionals who need flexibility without sacrificing security.
What to Do Immediately After Re-enabling Your Virus Protection
Re-enabling your antivirus protection is not the final step — it is the beginning of a critical post-incident verification process. Even a brief unprotected window can allow threats to establish a foothold on your system. The steps you take in the minutes and hours immediately after re-enabling protection are just as important as the precautions you took before disabling it.
The Critical Post-Re-enablement Checklist
- Verify Protection Status: Do not assume your antivirus is active — confirm it. Open Windows Security or 360 Total Security and visually verify that real-time protection shows as On or Protected (green status). If it shows as inactive, re-enable it immediately before doing anything else.
- Run a Targeted Quick Scan: Launch a quick scan focused on the directories, files, and processes you interacted with during the unprotected period. In 360 Total Security, you can use the Custom Scan feature to target a specific folder for a fast, focused check.
- Check System Performance: Monitor your system for unusual CPU, memory, or disk activity in Task Manager (
Ctrl + Shift + Esc). Anomalous resource consumption immediately after re-enabling protection can be an early indicator of a threat that established itself during the window. - Review Security Logs and Alerts: Check your antivirus software’s event log or history section. Both Windows Defender and 360 Total Security log all detection events — review any alerts that were generated in the period immediately after protection was restored, as these may indicate threats that were caught on first scan.
Monitoring for Signs of Infection
Even after a clean quick scan, remain vigilant for behavioral indicators of compromise in the hours following your unprotected window:
- Unexpected System Behavior: Unexplained slowdowns, browser redirects, new desktop icons, changed homepage settings, or unfamiliar processes in Task Manager are all potential red flags that warrant immediate investigation.
- Antivirus Detection on Restart: Some threats only activate on system reboot. After completing your task and re-enabling protection, reboot your system and observe whether your antivirus immediately flags anything during the startup scan sequence.
- Secondary On-Demand Scan: For maximum assurance, run a secondary, on-demand malware scan using a complementary tool. This provides a second opinion and can catch threats that may have evaded your primary engine during the vulnerable window.
Long-Term Lessons and Configuration Adjustments
- Formalize Your Exclusion: If you disabled protection to install a trusted program that was causing a false positive, do not repeat this process in the future. Immediately add that program’s executable or installation directory to your permanent exclusions list as described in the previous section.
- Upgrade Your Security Toolset: If the rigidity of Windows Defender’s disable controls made this process more stressful than it needed to be, evaluate whether a more configurable solution like 360 Total Security better suits your workflow. Its timed pause, modular controls, and intuitive exclusion management are specifically designed for users who need this level of flexibility.
- Document the Incident: Whether you are a home user or an IT professional, document what you did, why, how long protection was disabled, and what the outcome was. This creates an audit trail and helps you or your team respond more efficiently if a similar situation arises.
| Action | How to Do It | Why It’s Important |
|---|---|---|
| Verify Protection Status | Open Windows Security or 360 Total Security; confirm green/On status | Ensures your system is actively protected before resuming normal activity |
| Run a Quick Scan | Use Quick Scan or Custom Scan on affected directories | Catches any threats introduced during the unprotected window |
| Check System Performance | Open Task Manager; monitor CPU, RAM, and Disk usage | Identifies anomalous processes that may indicate a background threat |
| Review Security Logs | Check Protection History in Windows Security or 360 Total Security logs | Reveals any detections that occurred immediately upon re-enabling |
| Reboot and Observe | Restart Windows 11 and monitor startup behavior | Activates startup-triggered threats and allows antivirus to run a boot-time scan |
| Add Permanent Exclusion | Navigate to Exclusions in your antivirus settings and add the trusted item | Prevents the need to disable protection for the same item in the future |
| Document the Incident | Record actions taken, duration, and outcome in a log or IT ticket | Creates accountability and improves future response efficiency |
Frequently Asked Questions
Q1: Is it safe to temporarily disable antivirus on Windows 11?
It can be done safely if you follow strict precautions: disconnect from the internet, limit the disabled period to the minimum necessary (ideally under 15 minutes), have an alternative protection layer active, and immediately run a scan after re-enabling. However, the safest approach is almost always to use exclusions rather than disabling protection entirely. Full disabling should be a last resort.
Q2: Will Windows Defender automatically turn back on after I disable it?
Yes. Windows 11 is designed to automatically re-enable Microsoft Defender Antivirus after a reboot or after a scheduled maintenance task runs. However, you should never rely on this auto-restore mechanism — always manually re-enable protection as soon as your task is complete and verify its status in the Windows Security app.
Q3: What is the difference between pausing antivirus and adding an exclusion?
Pausing or disabling antivirus removes protection from your entire system for a period of time, leaving all files, processes, and network connections unmonitored. Adding an exclusion tells your antivirus to ignore only a specific file, folder, or process while keeping all other protections fully active. Exclusions are always the safer, professionally recommended choice when you need to allow a specific trusted item to operate without interference.
Q4: Can I disable antivirus on Windows 11 without administrator rights?
No. Disabling real-time protection in Windows Defender requires administrator permissions and will trigger a User Account Control (UAC) prompt. This is an intentional security design by Microsoft to prevent unauthorized or accidental disabling of system protection. If you do not have administrator rights on your machine, contact your IT department for assistance.
Q5: Why should I consider 360 Total Security instead of just using Windows Defender?
360 Total Security offers several advantages for users who need more control over their security settings on Windows and macOS desktops. These include a user-friendly timed pause feature (so protection automatically re-enables after your set duration), modular protection controls (pause only specific engines rather than all protection), more intuitive exclusion management, and a comprehensive security dashboard. For power users, developers, and IT professionals who regularly need to manage protection settings, these features significantly reduce the risk of human error during sensitive operations.
About the Author: This article was written by a Senior Technical Security Writer with over 12 years of experience in endpoint security, Windows system administration, and cybersecurity content development. Specializing in translating complex security concepts into actionable guidance for both home users and enterprise IT professionals, the author has contributed to security awareness programs, enterprise IT policy documentation, and consumer-facing technical guides for leading cybersecurity organizations worldwide.
Learn more about 360 Total Security